After recently completing our first VisualFX commission my girlfriend (and team mate on the work) suggested I write down everything we did and learnt from the shots. Who knows, maybe the information I give might help others have less pain in the future and if nothing else, it will be good to get what I learnt down on paper, even if it is virtual paper.
I had to stop doing the 11 second challenge I was about half way through (which was a shame as I never seem to find the time to finish these things) in order to do it, just so I get to show how far, here is a link to what I _did_ manage. The rig and model are not my own (credit for this goes to: Jason Baskin), I was concentrating on the animation, in this case, mostly just the lip sync'ing and some other bits and pieces.
11 second challenge WIP (about half way there) on Vimeo
The commission was make a viral ad that makes recycling mobile phones interesting while at the same time promote the love london festival. As the date for the love london festival was only 2 weeks away that was our first problem, short timeframe. Needless to say it wasn't going to be the last.
The ad itself was built around the catchphrase, 'What are you saving those old mobile phones for?
The first thing was to find a site for the shot, on a whim I asked a guy by the name of Graham Tilly from Risk Management Services Ltd if he could think of anywhere that might be suitable. (RMS were doing some work for me which I ended up very happy with) He came up with Artisans a beautiful office building in High Wycombe with a car park that might be just what I need. After getting permission from the owners (who we would like to thank) and a reconoitre of the site we fixed a date to bring the cameras back at the weekend, when the car parks would be pretty empty.
Amazing how one small mistake can set you down a road that dictates how the rest of the shot will go. Neither my girlfriend or I are camera gurus, cameraperson/cinematographer would never be used to describe us from the previous footage we had shot. I can take a reasonable photo and being comfortable behind the lens is something I want to get better at, especially lighting and shot composition, unfortuntely on the day of the site visit our main camera, the Canon XH-A1 turned up on site with the battery missing, I am not going to point fingers to whose responsibility it was, but between the two of us, it wasn't mine. It had already taken us 1hr 30mins to get to the site instead of the 40mins it should of taken, and 3hrs roundtrip to collect the battery again was not going to be an option. The decision was made to resort to the backup camera, the Nikon D90 DSLR which can shoot up to 5mins of movie at baby HD. We both knew that others had managed to get some good shots out of the camera so hopefully we could too. We were very fortunate to get good weather and strong shadows, both of which help in making a good shot (and help to ground the CG elements with good hard shadows) so we thought we would get away with it.
The first thing I learnt from the whole experience (apart from check the kit before leaving the house) was that it would be ideal to have a way to preview your shots while on location. When we got back and had a closer look at the wide shot it was obvious how overexposed it was. This didn't bode well for placing CG elements in the shot as they too would have to be overexposed to fit. The compression of the footage shot with the D90 was such that I didn't feel I could pull it back much in post so we just had to go with what we had. In retrospect, and under more ideal circumstances another shoot was really called for. But, we decided to get going with what we had, that's the problem with tight deadlines, compromise.
Onto the interesting bits, at least from a VisualFX side anyway. I will break the shot down into three areas, the dynamics, the modelling (including the texturing) and the lighting/rendering. Compositing was done by my girlfriend (as was most of the photoshop work), I will touch on this during lighting/rendering section.
Dynamics with Dynamica
I ran some Maya rigid body tests to see how many we could simulate at once, not a lot was the answer. This was a problem, a big problem. I didn't fancy having to hand animate about 10,000 mobile phones, that would be bad. After checking the net for solutions, in particular the cgsociety.org forums, we decided to go with Bullet Physics' Dynamica plugin for Maya as it was both free and simulated very quick. One thing I will say is it is not a finished product, we encountered problems with it which we will get into. Also, those expecting something similar to the Rigid Bodies built into Maya will be disappointed with the lack of functionality, such as 'Set Initial State' and any form of caching or baking. This is definitely a stripped down plugin that primarily just shows the dynamics and how fast they are (and they are fast). Although annoying, I didn't worry about this too much as I was confident I could script what was missing (some examples later).
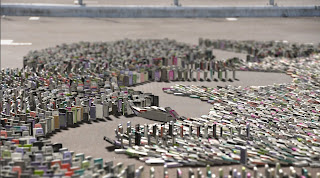
Our first major problem with Dynamica was the limit to the number of simulated objects, 4096. Most simulations probably run with a lot less than this number but unfortunately we had 10,000 phones to knock over. It seemed simple to split it up into the three shots, start off the first simulation, cut after about 3500 phones had fallen over, line up the next shot and start a new simulation carrying on from the last one, just taking the edge of the wave from the previous shot into the next simulation. This didn't quite work out as planned, I think I ended up with 5 simulations in all, one of which stop/starts right in the middle of a shot. This didn't prove to be too much of a problem as my compositor/editor eventually just took a few frames out and managed to make it look relatively seamless (although not perfect). All of these (on the surface) minor problems all impacted on time. Running the simulation, selecting all the simulated objects, removing all the frames (so as to reduce file size), saving to a new file, selecting the edge of the wave, the new ones to be included in the simulation and creating a new simulation based on these new objects, tweaking it to make sure the correct ones fell, then running it all while baking the animation into the actual phones (not the proxy objects).
Dynamica has an array which was extremely useful for this project as everything can be simulated with the same proxy object shape. Very early I decided not to worry too much about the relative differences in the phones dimensions when it came to the simulation, if someone wanted to pause the frame and possibly notice the lack of contact (or overlapping) then good luck to them, for me, it looked good enough during the tests. The main problem with the array was manipulating it. So I wrote a script that placed the proxy objects in the array to coincide with objects placed in the world, copying their location and orientation.
global proc replaceObjects() {
string $selected[] = `ls -sl`;
int $numSelected = size($selected);
if ($numSelected >= 2) {
string $arrayShape[] = `listRelatives -s $selected[0]`;
for ($i = 1; $i < $numSelected; $i++) {
setAttr($arrayShape[0]+".initialPosition["+($i-1)+"].initialPositionX", getAttr($selected[$i]+".tx"));
setAttr($arrayShape[0]+".initialPosition["+($i-1)+"].initialPositionY", getAttr($selected[$i]+".ty"));
setAttr($arrayShape[0]+".initialPosition["+($i-1)+"].initialPositionZ", getAttr($selected[$i]+".tz"));
setAttr($arrayShape[0]+".initialRotation["+($i-1)+"].initialRotationX", getAttr($selected[$i]+".rx"));
setAttr($arrayShape[0]+".initialRotation["+($i-1)+"].initialRotationY", getAttr($selected[$i]+".ry"));
setAttr($arrayShape[0]+".initialRotation["+($i-1)+"].initialRotationZ", getAttr($selected[$i]+".rz"));
}
setAttr($arrayShape[0]+".numBodies", ($numSelected - 1));
} else {
// Error, print some message on usage
print("Usage: replaceObjects() requires the selection of 2 or more objects, the first should be the dRigidBodyArray.");
}
}
I then ran another script which created and linked random instances of the phones to the dRigidBodyArray:
global proc linkMe() {
string $selected[] = `ls -sl`;
int $numSelected = size($selected);
if ($numSelected == 2) {
string $arrayShape[] = `listRelatives -s $selected[0]`;
string $children[] = `listRelatives -c $selected[1]`;
int $numChildren = size($children);
int $numBodies = getAttr($arrayShape[0]+".numBodies");
group -em -w -name "instances";
for ($i = 0; $i < $numBodies; $i++) {
int $randomChild = rand($numChildren);
string $newObject[] = `instance -name ("instancedCopy_"+$i) $children[$randomChild]`;
parent $newObject "instances";
connectAttr($arrayShape[0]+".position["+($i)+"]", $newObject[0]+".t");
connectAttr($arrayShape[0]+".rotation["+($i)+"]", $newObject[0]+".r");
}
} else {
// Error, print some message on usage
print("Usage: linkMe() requires the selection of exactly 2 objects, the first should be the dRigidBodyArray, the second a group node with children of the random objects to place.");
}
}
The astute group amongst you will realise I probably should of passed the group name as a parameter and then kept the return name of the actual group created and used that as the group to parent the instances too (I bet you don't care, neither did I). The simulation runs (word of warning, more often than not, the first time you run a newly created simulation the objects seem to behave very strangely, you will see what I mean, rewind and start again and it should be fixed) but nothing is baked and the objects aren't sitting perfectly on the floor. The next script does a set initial state on the array:
global proc setInitial() {
string $selected[] = `ls -sl`;
int $numSelected = size($selected);
if ($numSelected == 1) {
string $arrayShape[] = `listRelatives -s $selected[0]`;
int $numBodies = getAttr($arrayShape[0]+".numBodies");
for ($i = 0; $i < $numBodies; $i++) {
setAttr($arrayShape[0]+".initialPosition["+($i)+"].initialPositionX", getAttr($arrayShape[$i]+".position["+$i+"].positionX"));
setAttr($arrayShape[0]+".initialPosition["+($i)+"].initialPositionY", getAttr($arrayShape[$i]+".position["+$i+"].positionY"));
setAttr($arrayShape[0]+".initialPosition["+($i)+"].initialPositionZ", getAttr($arrayShape[$i]+".position["+$i+"].positionZ"));
setAttr($arrayShape[0]+".initialRotation["+($i)+"].initialRotationX", getAttr($arrayShape[$i]+".rotation["+$i+"].rotationX"));
setAttr($arrayShape[0]+".initialRotation["+($i)+"].initialRotationY", getAttr($arrayShape[$i]+".rotation["+$i+"].rotationY"));
setAttr($arrayShape[0]+".initialRotation["+($i)+"].initialRotationZ", getAttr($arrayShape[$i]+".rotation["+$i+"].rotationZ"));
}
} else {
// Error, print some message on usage
print("Usage: setInitial() requires the selection of one dRigidBodyArray to set the current position as the starting configuration.");
}
}
Once again, nothing too complicated. The only thing left was some baking:
global proc bakeMe(int $start, int $finish, int $increment) {
string $selected[] = `ls -sl`;
int $numSelected = size($selected);
if ($numSelected == 2) {
string $arrayShape[] = `listRelatives -s $selected[0]`;
string $children[] = `listRelatives -c $selected[1]`;
int $numChildren = size($children);
int $numBodies = getAttr($arrayShape[0]+".numBodies");
currentTime -edit $start;
for ($i = $start; $i < $finish; ) {
int $j;
for ($j = 0; $j < $numChildren; $j++) {
setKeyframe -attribute "t" $children[$j];
setKeyframe -attribute "r" $children[$j];
}
int $frameDone = $i;
do {
$i++;
currentTime -edit $i;
} while (($frameDone + $increment) > $i);
}
for ($k = 0; $k < $numChildren; $k++) {
string $token[];
tokenize $children[$k] "_" $token;
disconnectAttr($arrayShape[0]+".position["+($token[1])+"]", $children[$k]+".t");
disconnectAttr($arrayShape[0]+".rotation["+($token[1])+"]", $children[$k]+".r");
}
} else {
// Error, print some message on usage
print("Usage: bakeMe() requires the selection of exactly 2 objects, the first should be the dRigidBodyArray, the second a group node containing the corresponding objects!");
}
}
Now, a word of 'WARNING!' don't use the increment field as anything other than 1. I found this out to my peril and its responsible for some really nasty jumpiness in the final shot. For some reason I never worked out - the objects go through a strange rotation and flip if you do this, something to do with the values it assigns. To give an example: Take an object, on frame one key the rotation XYZ as 0, advance to frame 10, key the rotations to 180 and press play. Although the object looks the same at 0 and 10 it goes through that horrible flip that those familiar with animating will have experienced, going from 5 to 355 for instance when all you want is a 10 degree movement you end up with a 350 degree one. For some reason I never expected this in a dynamics simulation, but it was there and it was a headache that we never managed to get fixed (see end of post for why).
There was a lot more to the simulations as I mentioned (coping with the end of one and the start of another) but this gives you some of the tidier and simpler MEL script that I used to get around some of the Dynamica limitations. The full script file that I made during the project is included at the end (but I must warn you, it isn't pretty).
Modelling and Texturing
27 different mobile phone models giving about 50 different (when we recolour some). The last thing I wanted to do was model these all from scratch (given the timeframe). So I scripted the whole creation process, it was a compromise, giving me the rough shape and edges that had a rounded edge - so I got that specular ping on the edge. Not only did it model them in nurbs based on 3 curves, a top, side and bottom, it also textured them with projection nodes. I always meant to go back and plug one of the colour channels from the texture into the specular channel but things just ran away from us time wise and this got left out. The script itself is very long and ugly so I wont post it here, it is included in the file at the end called buildIt(name, scalingFactor).
I had some problems with this approach which I should of forseen. The projected textures seemed like a great idea at the time but once I started creating instances of these objects it became unwieldy to have so many projections and hence shaders linked to the instances (it would of made the file ridiculously large and unwieldy). So I converted the models to polys and converted the projected textures to file textures using the command from the Hypershade -> Edit->ConvertToFileTexture all within the one script: polyfy(). This left me with a single polygonal object with the textures assigned and UV's mapped. It actually worked better than I thought it would.
Could I have modelled 27 different models, UV'd and textured them in the time it took me to write these scripts? Possibly, but I try to reduce the repetitive things to scripts wherever possible and as I get faster in scripting I think it will end up being a much better way to spend my time. Although I will admit sometimes the results didn't capture a perfect likeness of the phone with the scripting approach but it was more than enough for this project.
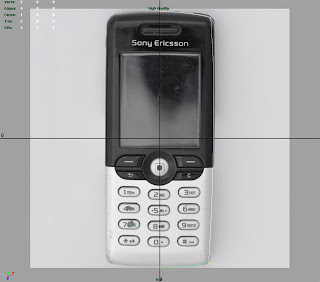
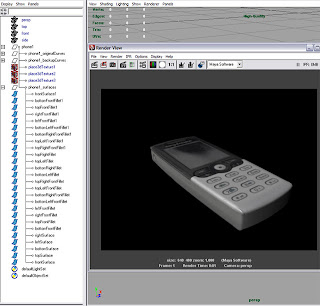
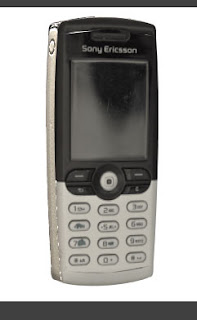
Here is a sample of the progression as I am sure 95% of the readers of this blog wont check the scripts out for themselves...

First image has me with a simple surface shader and the front phone texture on so I can align the curves (which have been selected in order top/side/bottom).

Second image is what you get immediately after typing buildIt("phone1", 1.0), at least I think that's the scaling factor for this phone...

The third image is after both the polyfy() command and bumpIt() has been run over the phones, you can see some gaps and its not perfect but there are no close ups of the phones in any shots so I was happy with this as a final result.
All of the images for the textures came from setting up a light tent outside and my girlfriend and I taking all the pictures in an afternoon. She then ran them through photoshop cropping, centring and later, creating more colours for the phones based on the images we had. She also had to remove the screens as a lot of the phones (most in fact) were ex-shop demonstration models complete with screen pictures.
Lighting and Rendering
The plates dictated the look of the CG, I hated the wide shot as the highlights were so blown out as to make some of the phones only look realistic when similarly blown out. Annoying when you go to such lengths to make reasonable looking phones and then have to blow them out. By the time we got to the rendering time we were really pushed, I so wish we could of gone back, re-shot everything with the right camera, and had more time to do the whole thing justice. I had hoped to get some camera movement with camera tracking into the whole thing as I think that would of helped sell the CG a little more.
I am still proud of the side shot, especially when it got run through FCP by my girlfriend and the speed increased about 40-50% as at the moment it looks like its in slow motion.
Some of the phones don't have bump maps and as mentioned previously a seperate specular map would of helped, but the size of the phones in shot made them not essential.
Final Thoughts
My PC started crashing badly towards the end, not Maya crashing, the whole machine just resetting with no reason. Like someone stepped on the power. At one point this happened 3 times in 2 mins (once shortly after the GRUB screen). This really didn't help with a very tight deadline. Add memory issues into this, the dynamics, especially when baking the simulation frames, took a lot of memory and I used the /3GB switch in 32bit windows to get as much as I could in one simulation but it didn't solve all my problems. I have a 32 bit windows install and a 64 bit linux install (which I used for rendering) this whole experience has made me desperate to get a 64 bit Vista install as Dynamica doesn't work under linux.
The scripts: These were never meant to be seen by anyone else so please, don't send me complaints about how difficult they are to follow and how I should of tidied them up. If someone wants to pay me for a couple of weeks to write useful menu items/scripts for the Dynamica plug-in then no problem, I could do with the work. :)
MEL Script file
The final shots: There should be a voiceover and some splash screens to go with this. The wide shot (the one I don't like the colours/exposure of) looks better in full HD for some reason. Whereas the side shot looks a bit more CG like in HD. Anyway, take it for what it is, unfinished and in need of better back plates. The end part needs the dynamics redoing due to my PC crashing after we tried to save time using the increment variable while baking (see previous post).
Final Shot on Vimeo
If you got this far, thanks for reading...
Gary Jones